DID Ordering Overview
| Purpose |
DID Ordering enables ordering Bandwidth DIDs directly out of TBS. This can be enabled for employees and customers and allows the user to search, review and order DIDs that will be automatically imported into TBS as products. |
| Security | DidOrdering module Add permissions |
| Taxing Impact | N/A |
| Commission Impact | N/A |
DID Ordering Module Setup
User Permissions
LOCATION: Setup / Users & Security / User Groups
To enable access to the DID Ordering in TBS, users will need Add permission to the DidOrdering module. This can be added to User Groups for internal users or to the customer User Groups based on who should have access to the DID Ordering.
To access the DID Ordering setup sections, the user group must also have the Admin box checked. The following steps for setup require this admin level access.
Company Configuration
LOCATION: Setup / Company Settings / Companies / Select Company / Bandwidth DID Ordering Section
To enable the DID Ordering functionality for a Company in TBS, the Bandwidth DID Ordering section must be completed
When editing a company, the following fields must be filled out:
-
Account ID - The main Bandwidth account ID. This is available on main page of the Bandwidth Dashboard.
-
Sub-account ID - The Bandwidth sub-account ID that is associated with the company. This is available on main page of the Bandwidth Dashboard.
-
Username - Bandwidth Username that is used to connect to the Bandwidth Dashboard.
-
Password - Bandwidth Password that is used to connect to the Bandwidth Dashboard.
-
Environment - Determines if the Bandwidth Production or Test environment will be used. This should always be set to Production in your live environment.
-
Product Review Status - This drop-down field determines the Product Status of all products brought into TBS through the DID Ordering process. It is recommended that a new Workflow Action is used, such as "DID Ordering Review" to ensure all imported DIDs are validated. For additional information on Workflow Action see the Status & Workflow Action Overview.

Product Type Setup
The Product type setup for DID Ordering consists of 3 components, a template product, a parent Product Type of the DIDs, and a child Product Type for the DIDs. Each of these are required and the setup is broken out below:
1.) Add Template Product
LOCATION: Products / Product Inventory / Template Products
The template product that will be used to initially create the DIDs being ordered. This product needs to have the same Product Type that the DIDs will have, but it should not include any rate plans or charges since the DID Ordering process will attempt to create charges and plans from existing DIDs.
If using a new template product, navigate to the Template Products page and select Add Product. The Is This Product a Template? box must be checked, the Product Type must match the type that will be used for the DIDs and all required fields must be filled out.
2.) Configuring Parent Product Type
LOCATION: Setup / Product / Product Types
From the Product Types page, open the product type that will be the parent product to all DIDs ordered. Edit the product type, navigate to the DID Ordering section and in the Child Products Type drop-down select the product type of the DIDs being ordered.
For this step, you will normally open and edit the SIP Trunk product type and set the Child Products Type to VoIP.

Note: A parent product type must be set for DID Ordering. Internal employees have the ability to launch the module and order DIDs when there is no parent product on the customer, but no charges or plans will be assigned to the product. Customers using the customer portal cannot access the DID Ordering unless there is a parent product already assigned to the customer's account.
3.) Configuring Child Product Type
LOCATION: Setup / Product / Product Types
For the final step, return to the main Product Types page and open the product type for the DIDs being ordered (This must match the template product type and the child product type set in the previous steps). Edit the product type, navigate to the DID Ordering section and in the Product Template drop-down select the template product for the DIDs being ordered.

Adding Carrier Tier Options
In order to apply the correct charges and rate plans, DIDs that are ordered will look for a child product with the same parent product and Carrier Tier. If a match is found, the new DID will inherit the charges and rate plans of the matching product with the highest recurring monthly charge.
If a DID is ordered with a tier that does not exist in TBS, that tier will automatically be added to the drop-down list and available in the Carrier Tier field going forward.
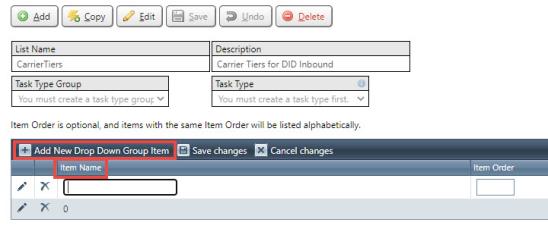
To manually add Carrier Tiers, navigate to the Drop Down list page in setup.
LOCATION: Setup / System / Drop Down Lists / CarrierTiers
If CarrierTiers is not available in the list, add a new list with:
List Name: CarrierTiers
Description: Carrier Tiers for DID Inbound
Once CarrierTiers is an option in the list, open it and use the Add New Drop Down Group Item enter an Item Name and Save the changes.
Using DID Ordering Module
Launching DID Ordering
Internal Employees
Launching DID Ordering without a pre-selected parent product
LOCATION: Customer / Products / Add Product / Order New DIDs / Create VoIP Product
From the Customer Products section, the Order New DIDs option will be available in the Add Product drop-down menu options for the All Products tab, and the tabs for product types that are setup as a DID product type or parent product type.

Launching DID Ordering from a parent product
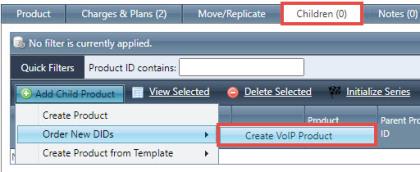
LOCATION: Customer / Products / Select Details for Parent Product / Add Child Product / Order New DIDs / Create VoIP Product
To order DIDs directly from a parent product, go to the Children tab on the product and Add Child Product. This menu will have the Order New DIDs option. When using this method, the Parent Product will be automatically populated.
Customer Portal Users
Customers will only see the Order New VoIP DIDs option when they have at least one parent product type active on their account. When available, customers can launch the module from Services and Order New VoIP DIDs or from the homepage by clicking the Order New VoIP DIDs icon.

Search Criteria for DID Ordering
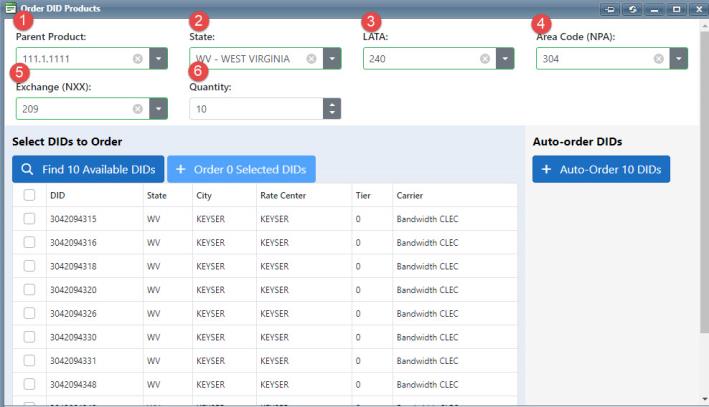
There are a variety of search criteria available. Each field is described below.
Requirements:
Internal users - at least one of the DID search criteria must be filled out (State, LATA, Area Code, Exchange).
Customer portal users - the Parent Product and at least one of the DID search criteria must be filled out.
Fields:
-
Parent Product: A drop-down list of parent products on the customer and active in TBS
-
State: A list of all states
-
LATA: Local access and transport area
-
Area Code (NPA): Numbering Plan Area / Area Code
-
Exchange (NXX): Exchange / Central Switching Office Designation
-
Quantity: Number of results to return
Placing Order
Order Selected DIDs
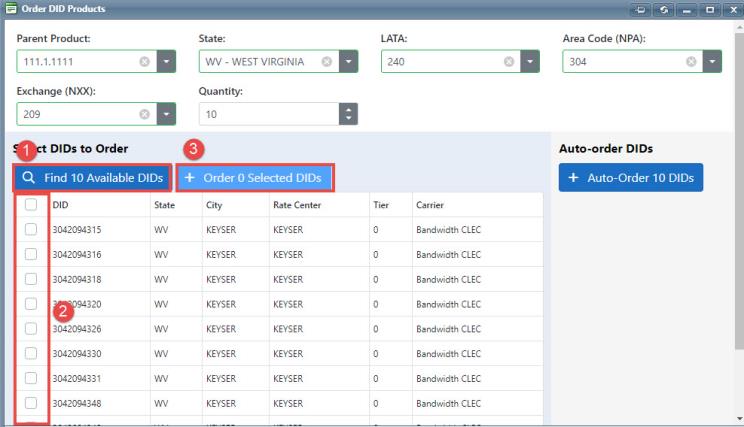
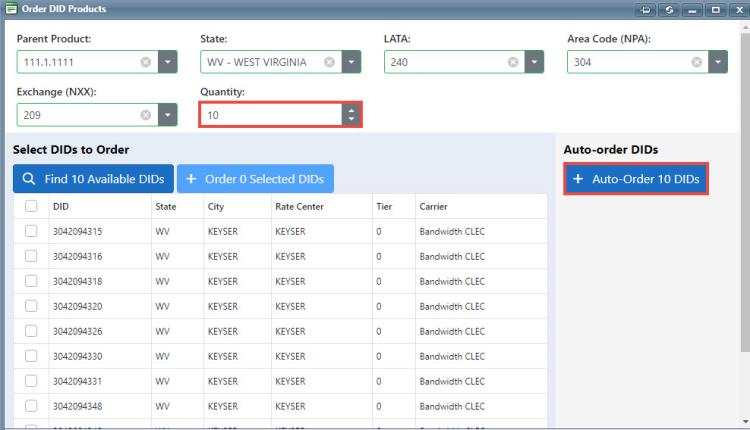
To manually select DIDs, set the Quantity field to the number of results you would like to choose from and (1) select Find ## Available DIDs. In the search results (2) check the boxes for all DIDs you would like to order. Finally (3) click the Order ## Selected DIDs button to place order.
Auto-Order DIDs
To automatically order DIDs that match your search criteria, set the quantity to the number of DIDs that you would like to order and click the Auto-Order ## DIDs button.
Reviewing DIDs Ordered
-
DIDs ordered will be entered into TBS with an active date pre-populated with the day of the order.
-
The status of the products will be based on what was entered in the Company Configuration.
-
If a Parent Product is set when ordering DIDs, all DIDs will automatically be brought into TBS as child products under that parent.
-
DIDs that are ordered will attempt to find a matching product type with the same parent product and carrier tier. Additional information on carrier tier is available in the Adding Carrier Tier Options section.
-
If matches found - TBS will find the matching product with the highest total recurring charges and apply all charges and rate plans on that product to the newly ordered DID
-
If no match found - The product will be added to the customer with no charges or rate plans.
Notes: If no Parent Product is set when ordering the DIDs, charges and plans will never be inherited and will need to be manually added
-